Last Updated on March 15, 2024
If you work as a data analyst or marketing specialist, you may already know how time consuming formatting tables and reports can be.
Keyboard shortcuts are more than welcome, as they can save you lots of time on repetitive formatting tasks.
The Merge and Center feature in Excel allows you to combine multiple cells into one larger cell and center the contents. This shortcut is extremely useful for creating titles and headers in reports, dashboards, and other documents.
In this guide, we’ll explain exactly how to merge and center cells in Excel using the shortcut, when you may want to use it, and some tips for applying it effectively.

What is Merge and Center in Excel?
The Merge and Center tool combines the selected cells into a single larger cell. It then centers the contents horizontally and vertically within the new merged cell.
For example, merging six cells in a 2×3 block would create one larger 2×3 cell. Any text or values from the top-left cell would be centered in the new merged area.
This is particularly helpful for centering a title or header over multiple columns. Rather than trying to distribute text across individual cells, you can merge them and center the text all at once.
How to Use the Merge and Center Shortcut
Merging and centering cells in Excel is very straightforward using the keyboard shortcut:
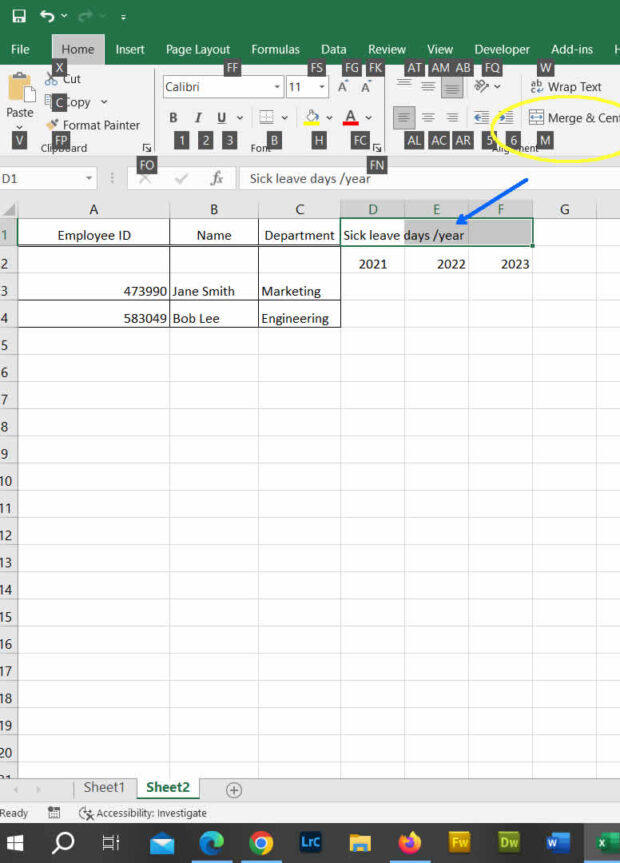
1. Select the cells you want to apply the merge and center shortcut to. This can be a single row or column, a rectangular block, or other shape.
2. Press Alt + H + M on your keyboard. This shortcut activates the Merge and Center command.
3. The selected cells will instantly merge into one and the contents will be centered inside it.
Alternatively, you can access it through the ribbon:
1. Select the cells to merge.
2. Go to the Home tab.
3. Click the Merge & Center icon in the Alignment section of the toolbar.
The shortcut method is usually faster once you get used to it. But the ribbon works as well.
When to Use Merge and Center in Excel
Some common uses cases for merging and centering cells include:
– Creating report titles – Merge cells across the top of your sheet and center your report title inside.
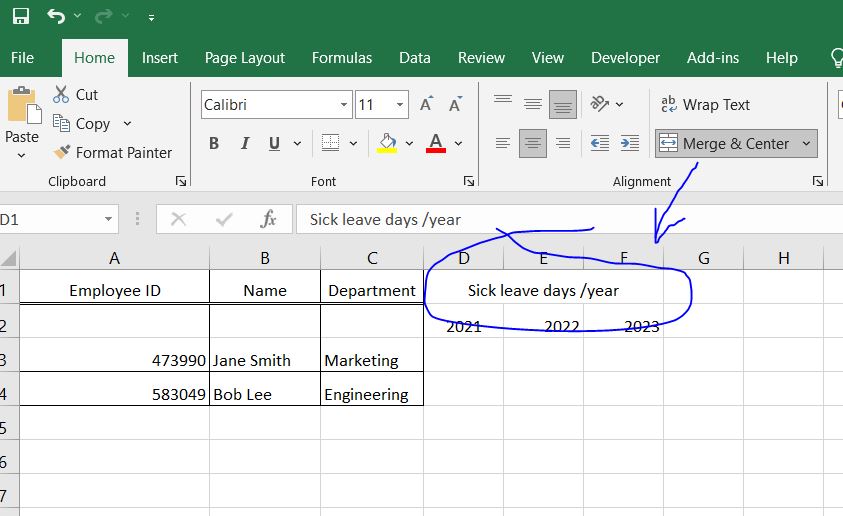
– Headings for data columns – Merge and center a heading over multiple data columns.
– Dashboards and charts – Use merged cells to neatly center and align dashboard components like charts, KPIs, and visualizations.
– Displaying an introduction – Merge a block of cells to center a descriptive introduction to your sheet or one section.
– Building cover pages – Design cover pages for reports by merging cells in different layouts and centering text.

The result of applying the merge and center function is that the text gets nicely centered across all previously selected columns
Tips for Merging and Centering
Here are some tips to use Excel’s Merge and Center functionality effectively:
– Be consistent with cell merging to keep your sheet clean and professional looking. Align merged cells evenly across rows or columns.
– You can re-merge cells to expand an existing merged block if needed. But avoid overlapping merged cells.
– Center large blocks of text vertically for easier readability. Break into paragraphs or bullet points.
– Add cell borders around merged blocks to visually contain content for better layouts.
– Merge and center empty cells to create useful white space and gaps between report sections.
– Be careful when merging cells with existing data – the other content will be overwritten.
Take some time to experiment with merging layouts and centering techniques to optimize your worksheets. Mastering this shortcut unlocks all kinds of design possibilities!
Let me know if you have any other questions about using Excel’s handy Merge and Center feature.
Before you go, read this article to learn why it is so important to keep your Excel file size as small as possible. Spreadsheets with huge amounts of data may also benefit from error-chasing formulas such as IF ISNA and VLOOKUP.


