Last Updated on April 20, 2020
Buying a domain name is not enough to have a website up and running. You need to host your site on a server. In order for this to work, you have to point the DNS servers of your domain name to the values indicated by your webhosting company.
I’m giving you this example: I bought a domain name from Namecheap and a hosting account from Bluehost. When I bought the domain name, I didn’t know where I was going to host my site yet, so I didn’t enter any DNS servers. Now that I decided to put it on Bluehost, I need to make the DNS names ns1.bluehost.com and ns2.bluehost.com, as indicated in my Bluehost account. It doesn’t matter where you get your webhosting from. All companies will provide you the DNS servers you need to point your domain name at. Make note of these values, then go to the registrar where you bought your domain from and replace whatever default values with your new ones. I’ll show you how to do it in NameCheap, GoDaddy and Moniker. If you need help with another registrar, just leave a comment here and I’ll add a short tutorial for you.
How to change DNS servers in NameCheap
After you enter your NameCheap login data, go to DOMAINS and choose Manage Domains from the drop-down menu.
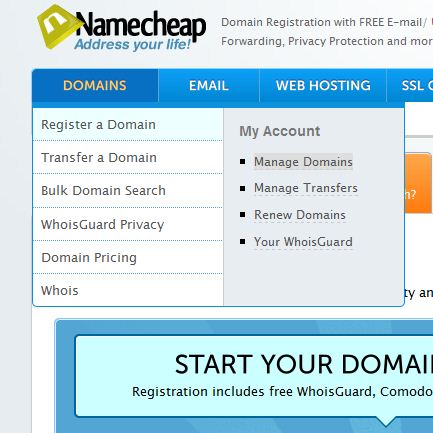
Go to "Manage Domains"
In the next screen, click on your domain name. Then, from the left side menu, choose “Transfer DNS to webhost”. Type the new DNS servers in the first two fields in the form, as you can see in the picture below:
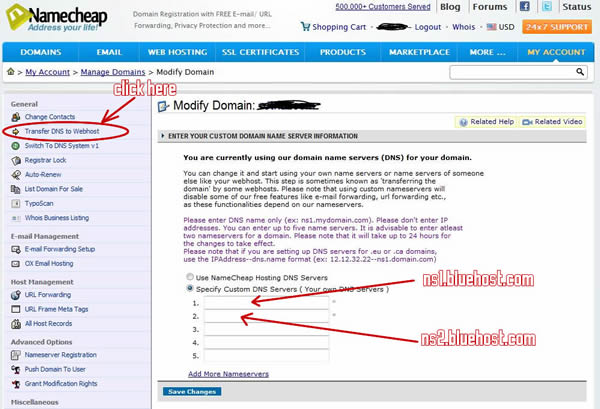
How to change DNS servers in NameCheap
Click on “Save changes” at the bottom of the form and you’re done. Keep in mind that it may take up to 24 hours until the changes become effective, so you can take a break until tomorrow, when we are going to see how to install WordPress using Simple Scripts or Fantastico.
How to change DNS servers in GoDaddy
Finding and changing the DNS servers in GoDaddy would be easy if they didn’t have such a busy page design. It’s like they want to upsell you everything they have. Anyway, you first need to go to Domain Manager, which is easy to find. Just click on MyAccount (the last item in the main menu) and you’ll then see “My Domains with a link that says “See all in Domain Manager”. If you click on that, you’ll see a login form and right after you login you’ll be in your Domain Manager. From there, choose the domain name you want to change DNS servers for.
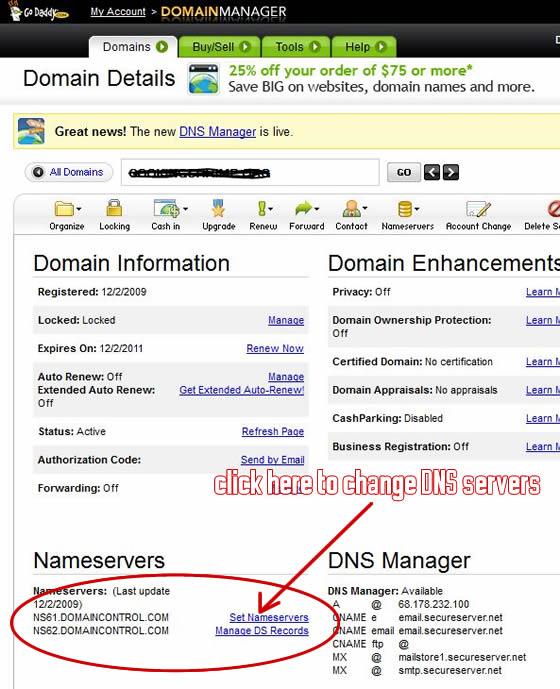
This is where you change the DNS servers from in GoDaddy
After you choose your domain name, click on it, then click on Set nameservers, as you can see from the picture above. After you make sure you have selected the “I have specific nameservers for my domains” radio button, enter your desired values for Nameserver 1 and Nameserver 2. For Bluehost, they will be ns1.bluehost.com and ns2.bluehost.com:
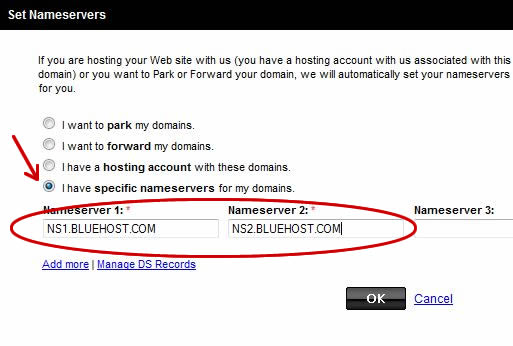
Replace GoDaddy's default name servers with the ones provided by your hosting company
Click OK and you’re done. Don’t forget that it takes hours for the changes to become active. This is valid for any other registrar and any other webhost. It’s how the internet works.
How to change DNS servers in Moniker
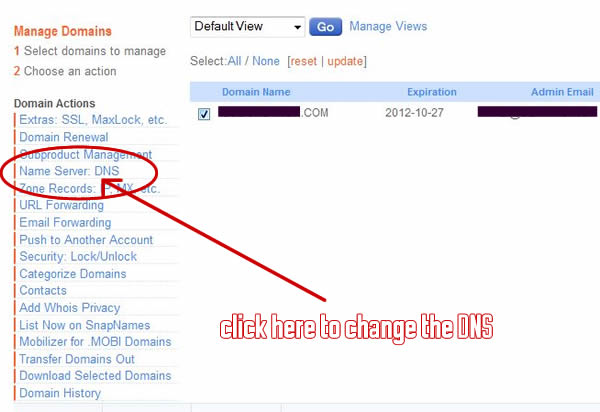
Choose Name Server: DNS to edit your nameservers
Next you have to click on your domain name to enter the DNS editing mode:
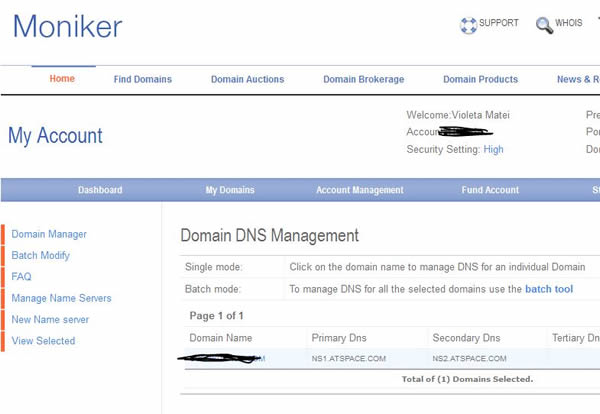
Click on your domain name. Mine is erased because I don't want you to see it 🙂
All you need to do now is enter your new nameservers and your site will be ready to go:
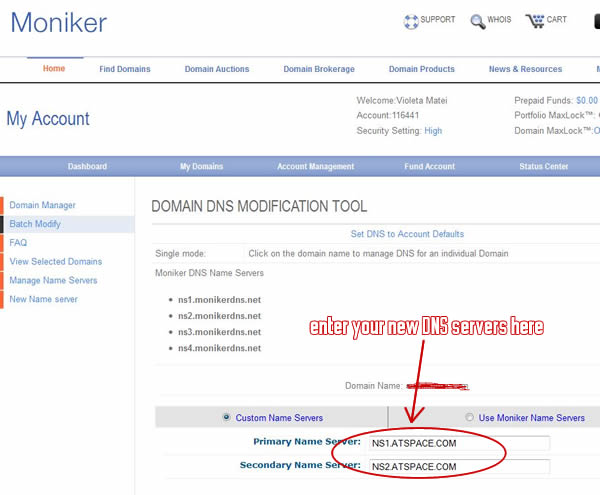
Enter your nameservers as shown here
Now you are ready for installing WordPress on your site. I’ll show you how to do it in one of the next lessons.
Resources used in this lesson:
- Bluehost shared hosting account: $5.95 per month
- .com domain name registered with NameCheap: $9.98 per year
- .com domain name registered with GoDaddy: $9.99 per year
- .com domain name registered with Moniker: $8.99 per year
Seeing that you only need to buy one domain name from any of the registrars, your costs for operating a website are about $80 per year. This is the minimum needed you have to pay for. Everything else can be found online for free if your budget doesn’t allow any extras.


