If you’re a Microsoft Excel user, you probably know how much time repetitive tasks take. The good news is that you can speed up your work by recording and customizing macros. When it comes to Excel macros, sky is the limit. Just get creative and put your ideas into practice.
Any task you can write a formula for can become the topic for an Excel macro. Even basic formatting you can obtain by applying the Merge and Center shortcut can be automated by recording a macro.
What Are Excel Macros & Some of Their Benefits?
- Macros are programmed instructions that automate repetitive tasks in Excel
- They allow you to complete tasks with a single click instead of numerous manual steps
- Benefits include saving time, reducing errors, customizing Excel to your needs

Recording Macros in MS Excel
Here are the main steps to record a simple macro:
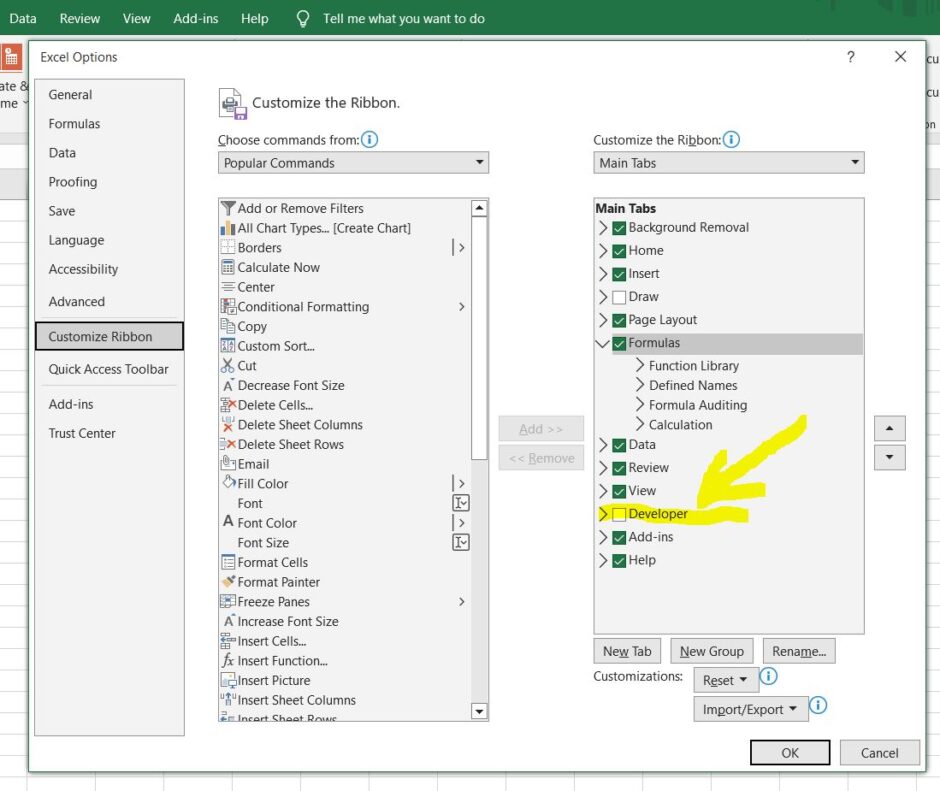
- Enable the Developer tab (File > Options > Customize Ribbon) – see the screen capture above
- Click the Record Macro button on the Developer tab
- Give the macro a name, e.g. “Format Report”
- Complete the steps to automate, like formatting cells, adding formulas
- Click the Stop Recording button
Tips for Effective Recording of Macros
- Plan the steps before recording
- Keep steps simple and logical
- Name macros clearly, e.g. “Add_Borders” – you’ll thank yourself for this later
Tips for Running Macros
-To run a recorded macro:
- Click View Macros from the Developer tab
- Select the macro and click Run
You can also assign keyboard shortcuts to your custom macros. For example, Ctrl+Shift+N could run a macro named “Add_Now”
You can add shortcut buttons to the Quick Access Toolbar or a custom toolbar for speed of access to your Excel macros.
Editing Macros
Sometimes you need to edit your previously recorded macros, in order to suit your goals.
To edit a macro, open the Visual Basic Editor (Developer tab > Visual Basic)
Example of macro code structure:
Sub Format_Report()

'Format Column Headings

Range("A1:D1").Font.Bold = True

Columns("A:D").ColumnWidth = 18

'Add Borders

Range("A1:D10").Borders(xlEdgeBottom).LineStyle = xlContinuous

Range("A1:D10").Borders(xlEdgeRight).LineStyle = xlContinuous

Range("A1:D10").Borders(xlEdgeLeft).LineStyle = xlContinuous

Range("A1:D10").Borders(xlEdgeTop).LineStyle = xlContinuous

End Sub
– You can modify the code to customize your macro steps as needed.
Advanced Usage
Here are some cases of advanced usage of Excel macros.
Pass arguments to macros to make them more dynamic
Sub FormatRange(RangeToFormat As Range)

RangeToFormat.Font.Bold = True

RangeToFormat.Borders.LineStyle = xlContinuous

End Sub
Use conditional logic and loops
For i = 1 to 10

If Cells(i,1).Value > 1000 Then

Cells(i,1).Font.Color = vbRed

End If

Next i
Nest macros by calling one from another
Macros can be nested by calling one macro from within another macro. This allows you to break down complex tasks into smaller, reusable macros.
Here’s an example of nesting several Excel macros:
Macro1:
Sub FormatCells()

'Format cells code

End Sub
Macro2:
Sub AddBorders()

'Add borders code

End Sub
To nest the macros:
Macro3:
Sub FormatAndBorder()

'Call FormatCells macro

FormatCells

'Call AddBorders macro

AddBorders

End Sub
The Macro3 now runs both FormatCells and AddBorders in sequence by calling them.
Main Benefits of Nesting Macros
- Reduces duplicate code
- Can reuse macros in different scenarios
- Improves code organization
- Easier to maintain and update
When nesting, ensure macros are in the correct order and pass any required variables or arguments properly between them.
Proper nesting improves code reuse, makes macros more modular, and simplifies complex tasks. It is an important skill for advanced macro programming.
What to do next to improve your Excel macros skills:
- Recap of key points about using macros to automate Excel tasks
- Refer to Microsoft documentation or courses for more VBA help


